Evan A Charan
Digital Media
Composite Photography
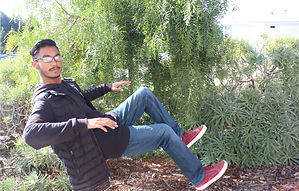
Levitation Composite Image
"A Ride In The Invisible Boatmobile"
Invisibility Composite Image
"Reaching Out"

Reflection
1. In as much detail as possible record the steps it took to complete this project. Start with photographing and end with the editing process in Photoshop. Use complete sentences
I started this project by first brainstorming on how I could take the photos for the levitation and invisibility images, at first I thought about using a stool and holding objects to achieve a sort of gravitational effect for the floating photograph, for the invisibility photo I wanted to use the mirror frames to create a portal effect and I ended up keeping this idea for the final photo. What made me change how I was going to create the floating photograph was that the photos I took were not to my liking, what was particularly bad about those photographs I took was that the ladder I used covered my foot which rendered the photo unusable for this project, I ended up using a stool to create the floating effect. I set the document up by opening Photoshop and then selecting "file", followed by "scripts", "load in stack", and then finally selecting the photos I wanted to use and clicking "attempt to align sources". For the levitation image, I arranged my photos into two layers with the background photo at the bottom and the other photo which was of me sitting on a stool on top of the layer list, I then added a layer mask to the photo of me sitting on the stool and used the paintbrush tool to remove the stool from the photo by selecting black as the color, this then left the photo of me and background photo making it seem like I was floating, when I looked back at the image after I completed it looked like I was sitting in an invisible car and that reminded me of the invisible car in Spongebob called the "invisible boatmobile" hence why I named the photo "A Ride In The Invisible Boatmobile". For the invisibility image, I set up the document the same way as I had done for the floating image except with the photos I took for the invisibility image. I then layered the photos the same way as I had done with the levitation images where the background was on the bottom of the layer list and the other photos were on top but for this one, I used three photos instead of two as I did for the other one, those two photos were of me on the right side with the mirror frame and me with the mirror frame on the left side. I started editing the photo of me on the right side first by using the same techniques I had used before in the other image but I used it to remove the bottom half of my body rather than a stool, I also removed the bottom half of my shadow to fit was being shown when I removed the bottom half of my body so it would look a little more realistic. I then edited the other photo of me on the left side using a layer mask and the paint brush tool with black selected to remove the top half of my body and the top half of my shadow, I also used it to make the other photo of me on the right side with the top half of my body appear by selecting white instead of black.
2. What are layer masks? How do the differ from just using the eraser tool in photoshop?How might you use them in the future to create more projects in photoshop?
A layer mask is a tool in Photoshop that lets you mask something in a specific layer which will not affect the other layers, this is particularly useful when you are working with multiple layers in Photoshop and want to combine all those layers to make a composite image. Layer masks are different from just using the eraser tool in Photoshop because it masks or hides a portion of the layer rather than remove or erase a portion of the layer, this makes it easy to undo things as nothing is really being removed or lost rather it is being covered up and that cover can be removed or put back on as many times as needed. I might use layer masks in the future to create more projects in Photoshop by taking advantage of the flexibility that tool has and how allows for more experiments to be conducted and how it can make something looked erased or removed but without actually doing that.
3. Do you believe your project was (successful/ unsuccessful). Why?
I believe my project was successful because I was able to meet the requirements for the project which was to create two composite images that had a minimum of two layers and show levitation and invisibility in those photos.
4. Based on the learning target, " Practice and demonstrate skills in the manipulation of digital imagery by using Photoshop to create a composite image" what level of mastery does your project demonstrate (Exceeds, Meets, Needs Work, minimal understanding). Why do you think? Make sure to provide specific evidence.
Based on the learning target, the level of mastery my project demonstrates is meeting the learning target as my project did include two layers with the other image having three layers and both of those images being able the convey their appropriate subject either being levitation or invisibility, however what those two images lack is creativity and for that reason my project demonstrates meeting the learning target since it was able to do what the learning target asked for but didn't go further than that.